bootstrap学习

Bootstrap 是最受欢迎的 HTMLCSSJS 框架,用于开发响应式布局、移动设备优先的 WEB 项目。Bootstrap 让前端开发更快速、简单。所有开发者都能快速上手且应用广泛。

下载

  • 官网地址官方实例
  • 使用CDN

    1
    2
    3
    4
    5
    6
    <!-- 最新版本的 Bootstrap 核心 CSS 文件 -->
    <link rel="stylesheet" href="https://cdn.jsdelivr.net/npm/bootstrap@3.3.5/dist/css/bootstrap.min.css">
    <!-- 可选的 Bootstrap 主题文件(一般不用引入) -->
    <link rel="stylesheet" href="https://cdn.jsdelivr.net/npm/bootstrap@3.3.5/dist/css/bootstrap-theme.min.css">
    <!-- 最新的 Bootstrap 核心 JavaScript 文件 -->
    <script src="https://cdn.jsdelivr.net/npm/bootstrap@3.3.5/dist/js/bootstrap.min.js"></script>
  • 下载 用于生产环境的bootstrap之后解压 本地引入
    以移动设备为优先 窗口和设备的屏幕一致,初始缩放100% 禁止用户双击
    bootstrap
    注:bootstrap是基于jquery开发的所以在引入bootstrap.js文件之前需要加入jquery文件
    bootstrap1
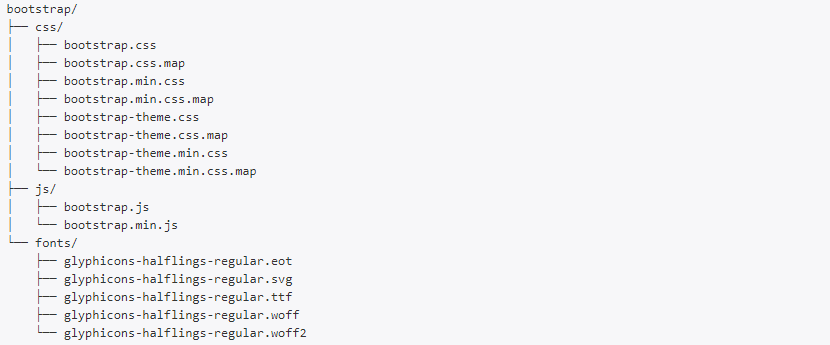
    下载的Bootstrap的基本文件结构:编译好的 CSS 和 JS (bootstrap.*) 文件,经过压缩的 CSS 和 JS (bootstrap.min.*) 文件。CSS 源码映射表 (bootstrap.*.map) 。fonts下 Glyphicons 的图标字体文件.
    bootstrap2

bootstrap对视口的划分

  • 超小屏幕(xs): < 576px
  • 小屏幕(sm): >= 576px
  • 中等屏幕(mg): >= 768px
  • 大屏幕(lg): >= 992px
  • 超大屏幕(xl): >= 1200px

布局容器

1
2
<div class=”container”> 固定容器: 在不同视口大小下就会有不同的固定宽度 </div>
<div class=”container-fulid”> 自适应容器: 宽度为100% </div>

栅格系统

Bootstrap的栅格系统使用统一的"行"和"列"来实现复杂的响应式布局,默认情况下将一行内容等分为12份,通过使用col-x类名在指定每一列占用多少份

1
2
3
4
5
6
7
8
9
10
11
12
13
14
15
16
<!-- 将栅格系统一定要放入容器中 -->
<div class="container">
<div class="row">
<div class="col-5">
<!-- offset-x 当前列偏移x份 -->
<div class="col-5 offset-2">
</div>
</div>
<div class="container-fulid">
<div class="row">
<!-- order-x 列排序 小的在前面 大的在后面 -->
<div class="col-4 order-3">
<div class="col-4 order-2">
<div class="col-4 order-1">
</div>
</div>

公共样式

1
2
3
4
5
6
7
8
9
10
11
12
13
14
15
16
17
18
19
20
21
22
23
24
25
26
27
28
29
30
31
32
<!-- 文字颜色 -->
<!-- .text-primary .text-success .text-danger .text-warning .text-dark -->
<div class="text-primary">颜色: 主要蓝</div>
<div class="text-success">颜色: 成功绿</div>
<div class="text-danger">颜色: 危险红</div>
<!-- 背景颜色 -->
<!-- .bg-primary .bg-success .bg-danger .bg-warning .bg-dark -->
<div class="bg-primary">颜色: 主要蓝</div>
<div class="bg-success">颜色: 成功绿</div>
<div class="bg-danger">颜色: 危险红</div>
<!-- 边框 -->
<!-- border/border-x 添加边框 border-color 边框颜色 round 圆角边框 -->
<div class="border border-warning round">警告黄圆角边框</div>
<!-- 浮动 -->
<!-- clearfix 清除浮动 bootstarp4.x float-left/right/none 浮动 bootstarp3.x pull-left/right 浮动 -->
<div class="clearfix">
<div class="float-left">左浮动</div>
<div class="float-right">右浮动</div>
</div>
<!-- 定位 position-* -->
<div class="position-relative">相对定位</div>
<div class="position-absolute">绝对定位</div>
<!-- 关闭按钮 -->
<button type="button" class="close" aria-label="Close"><span aria-hidden="true">&times;</span></button>
<!-- 三角符号 -->
<span class="caret"></span>
<!-- 让内容块居中 -->
<div class="center-block">...</div>
<!-- 显示或隐藏 -->
<div class="show">...</div>
<div class="hidden">...</div>
<div class="invisible">...</div>

排版的标签

1
2
3
4
5
6
7
8
9
10
11
12
13
<h1 class=”page-header”>内容</h1>  36px
<h2></h2> 30px
<h3></h3> 24px
<h4></h4> 18px
<h5></h5> 14px
<h6></h6> 12px
.h1,.h2,.h3,.h4,.h5,.h6 模拟h标签的样式
.page-header 设置页头 给标题加一个分隔线
<small></small> 副标题 小一号
<big></big>副标题 大一号
<strong></strong>推荐使用的加粗
<em></em>推荐使用的倾斜
<del></del>删除线

文本对齐方式

1
2
3
4
<p class="text-left">文字左对齐</p>
<p class="text-center">文字居中对齐</p>
<p class="text-right">文字右对齐</p>
<p class="text-justify">文字两端对齐</p>

英文大小写

1
2
3
4
<!-- .text-uppercase 英文大写 .text-lowercase 英文小写 .text-capitalize 首字母大写 -->
<p class="text-lowercase">lowercased text</p>
<p class="text-uppercase">UPPERCASED TEXT</p>
<p class="text-capitalize">Capitalized Text</p>

列表

1
2
3
4
5
6
7
8
9
10
11
<ul class="list-inline">
<li>.list-unstyled 去掉列表前面的符号 和去掉原有的格式</li>
</ul>
<ul class="list-inline">
<li>.list-inline 把li进行横向排列</li>
</ul>
<!-- .dl-horizontal 设置变成横向排列 -->
<dl class="dl-horizontal">
<dt>自定义列表</dt>
<dd>自定义列表项</dd>
</dl>

表格

1
2
3
4
5
6
7
8
9
10
11
12
13
14
15
16
17
18
19
20
21
22
<!-- .table 表格的一个基类
.table-bordered 给表格加外边框 为表格和其中的每个单元格增加边框。
.table-hover 鼠标放上去的悬停效果 放在行或单元格 背景变色
.table-striped 隔行换色 条纹状表格
.table-condensed 改变单元格的padding值 使表格变得紧凑些
.table-responsive 给table的父元素加以移动设备为优先,如果不能显示完全的显示 会出现滚动条
注: 状态类设置的是行tr或td
.active 鼠标悬停在行或单元格上时所设置的颜色
.success 标识成功或积极的动作
.info 标识普通的提示信息或动作
.Warning 标识警告或需要用户注意
.danger 标识危险或潜在的带来负面影响的动作 -->

<table class="table table-hover table-condensed table-bordered table-responsive">
<tr>
<td class="active">...</td>
<td class="success">...</td>
<td class="warning">...</td>
<td class="danger">...</td>
<td class="info">...</td>
</tr>
</table>

表单

1
2
3
4
5
6
7
8
9
10
11
12
13
14
15
16
17
18
19
20
21
22
23
24
25
26
27
28
29
30
31
32
33
34
35
36
37
38
39
40
41
42
43
44
45
46
47
48
<!-- 所有设置了 .form-control 类的 <input>、<textarea> 和 <select> 元素都将被默认设置宽度属性为 width: 100%;
.form-inline 类可使其内容左对齐并且表现为 inline-block 级别的控件
.form-horizontal 类可以将 label 标签和控件组水平并排布局
.checkbox-inline 或 .radio-inline 多选框(checkbox)或单选框(radio)使这些控件排列在一行
.form-group-lg 或 .form-group-sm 设置水平排列的表单组的尺寸
.input-lg 或 .input-sm 设置控件的尺寸
-->
<form class="form-horizontal">
<div class="form-group">
<label for="inputEmail3" class="col-sm-2 control-label">Email</label>
<div class="col-sm-10">
<input type="email" class="form-control" id="inputEmail3" placeholder="Email">
</div>
</div>
<div class="form-group">
<!-- 多选框 -->
<label class="checkbox-inline">
<input type="checkbox" id="inlineCheckbox1" value="option1"> 1
</label>
<label class="checkbox-inline">
<input type="checkbox" id="inlineCheckbox2" value="option2"> 2
</label>
<label class="checkbox-inline">
<input type="checkbox" id="inlineCheckbox3" value="option3"> 3
</label>
</div>
<div class="form-group">
<!-- 单选框 -->
<label class="radio-inline">
<input type="radio" name="inlineRadioOptions" id="inlineRadio1" value="option1"> 1
</label>
<label class="radio-inline">
<input type="radio" name="inlineRadioOptions" id="inlineRadio2" value="option2"> 2
</label>
</div>
<div class="form-group">
<!-- 下拉列表 -->
<select class="form-control">
<option>1</option>
<option>2</option>
<option>3</option>
</select>
</div>
<div class="form-group">
<!-- 文本域 rows 控制行数 -->
<textarea class="form-control" rows="3"></textarea>
</div>
</form>

按钮

为 <a>、<button> 或 <input> 元素添加按钮类(button class)即可使用 Bootstrap 提供的样式。

1
2
3
4
5
6
7
8
9
10
<!--
按钮颜色: btn-default btn-primary btn-success btn-info btn-warning btn-danger btn-link
尺寸: .btn-lg .btn-sm .btn-xs
块级按钮: .btn-block 将其拉伸至父元素100%的宽度,而且按钮也变为了块级(block)元素
禁用: 添加 disabled 属性
-->
<a class="btn btn-default" href="#" role="button">Link</a>
<button class="btn btn-primary btn-xs" type="submit">Button</button>
<input class="btn btn-warning btn-sm" type="button" value="Input">
<input class="btn btn-danger btn-lg" type="submit" value="Submit">

响应式图片

1
2
3
4
5
6
7
<!-- .img-responseive  响应式图片
.img-rounded 圆角矩形
.img-circle 圆形
.img-thumbnail 给图片加圆角的边框 -->
<img src="..." alt="..." class="img-rounded img-responseive">
<img src="..." alt="..." class="img-circle img-responseive">
<img src="..." alt="..." class="img-thumbnail img-responseive">

图标

1
2
3
<!-- glyphicon glyphicon-*  -->
<span class="glyphicon glyphicon-align-left" aria-hidden="true"></span>
<span class="glyphicon glyphicon-star" aria-hidden="true"></span>

导航

1
2
3
4
5
6
7
8
9
10
11
12
13
14
<!--
.nav .nav-tabs 设置标签页
.nav-pills 胶囊式标签页 .nav-stacked 垂直方向堆叠排列 .nav-justified 标签页等分宽度
-->
<ul class="nav nav-pills">
<li role="presentation" class="active"><a href="#">Home</a></li>
<li role="presentation"><a href="#">Profile</a></li>
<li role="presentation" class="dropdown">
<a class="dropdown-toggle" data-toggle="dropdown" href="#" role="button" aria-haspopup="true" aria-expanded="false">
Dropdown <span class="caret"></span>
</a>
<ul class="dropdown-menu"><li>1</li><li>2</li><li>3</li></ul>
</li>
</ul>

导航条

1
2
3
4
5
6
7
8
<!--
.navbar .navbar-default 导航条
.navbar-fixed-top 固定在顶部 .navbar-fixed-bottom 固定在底部
.navbar-inverse 反色的导航条
-->
<nav class="navbar navbar-fixed-top navbar-inverse">
<div class="container"></div>
</nav>

插件

1
2
3
4
5
6
7
8
9
10
11
12
13
14
<!-- 模态框 -->
<!-- .modal-lg/.modal-sm 模态框尺寸 -->
<button type="button" class="btn btn-primary" data-toggle="modal" data-target="#myModal">Large modal</button>
<div class="modal fade" tabindex="-1" role="dialog" aria-labelledby="myLargeModalLabel">
<div class="modal-dialog modal-lg" role="document">
<div class="modal-content"></div>
</div>
</div>
<!-- 用法一 使用 data 属性控制 在控制元素上添加 data-target="#myModal" -->
<!-- 用法二 通过javascript调佣 -->
<script>
$('#myModal').modal('show') // 手动打开模态框
$('#myModal').modal('hide') // 手动隐藏模态框
</script>
-------------本文结束感谢您的阅读-------------
0%